Stripping RSVR Factory frame
Printed From: rsvr.net Forums
Category: RSV / RSVR / FACTORY
Forum Name: Technical Chat
Forum Description: Any technical problems or useful advise for other owners, remember this is just advice posted here, if you make something go BANG in a big way don't take anyone to court about it.
URL: http://www.rsvr.net/forum_posts.asp?TID=20455
Printed Date: 27 Mar 2026 at 03:43
Software Version: Web Wiz Forums 12.07 - https://www.webwizforums.com
Topic: Stripping RSVR Factory frame
Posted By: albrown001
Subject: Stripping RSVR Factory frame
Date Posted: 04 Dec 2015 at 22:41
|
Anyone stripped a Gen 2 RSVR down to the frame? I know the factory comes in gold but I think the bike would look better with polished alloy. Got two options. Swap frame out with polished alloy one or try to save a bit of money and get the paint on my gold one stripped off. I'm a novice spannerer but not afraid of attempting it, have got most tools and reasonable space in the shed. Has anyone stripped a Gen 2 bike down to the frame? How hard would you say it is? Any specialist tools you can think of I might need and any advice. I'm in Dorset. Anyone willing to help or can help, on the cheap(ish)? Cheers
|
Replies:
Posted By: albrown001
Date Posted: 04 Dec 2015 at 23:03
 |
 markrsvr15 wrote:
Posted By: albrown001
Date Posted: 04 Dec 2015 at 23:20
|
Sweet. If there is anything else you think of please just keep adding them. I've had the wheels off, suspension off and all the plastic bits so far so not much further to go I suppose  I have always wanted to have the bike with polished frame and I am going to have a go at it now after what you mentioned. I will have to clean out my shed tomorrow and make some space. Will have to put some of it in the front room. Never mind hey...
|
Posted By: davidrsurfer
Date Posted: 05 Dec 2015 at 09:07
|
Polishing will be a pain to keep nice. Powder coat it & stay nice for longer. ------------- Motorcycle friendly self catering holiday apartment Acorn Studio. See us at Air bnb. |
Posted By: Ape
Date Posted: 05 Dec 2015 at 10:56
That's the spirit dude...With the wealth of infomation amongst all the boys/girls on here mate there isn't a thing you can't do if you have the tools (and the stones) to just try it, plus you'll learn so much about ya bike. ------------- www.apriliaperformance.co.uk www.apriliaforum.co.uk www.apriliaownersclub.co.uk RIDE IT LIKE YA STOLE IT BOSS !! |
Posted By: albrown001
Date Posted: 05 Dec 2015 at 13:51
|
Cheers. I'm definitely going for it now. Will start on it soon and the beginning of that will be moving some of the shed in to my front room. Probably have to put most of the bits off the bike in there too as I do it but will have lots of space in the shed then. Will be the most I have ever done to it. I'm really worried about getting the engine out and putting it back in as never done it before on something this big and complicated. I'm sure I will get stuck on loads of things at some point or another but definitely going for it now. I shouldn't break anything as I am a bit anal for things like that, just a bit worried I might get stuck but sure I can solve it on here if I do. Will keep everyone posted and I'll take some pics as I do it too. I've just had the bike serviced and valves done so will keep all the oil as its new but will just ditch all the coolant. Needs changing anyways, so not lost anything and it should just be ready for next year then. With a bit of luck
|
Posted By: Drew
Date Posted: 05 Dec 2015 at 14:05
| Mate take lots off pictures as you go , label all wiring as to were it goes , once your down to engine and frame lift frame off engine . and enjoy , also know when to walk away and leave it for a day or so, lots of wd40 . clean as you go .😀 |
Posted By: Shyted
Date Posted: 05 Dec 2015 at 16:31
|
You can keep it nice and shiny should you polish it by shelling out £20.00 on a kit from perfect polishing. Keeps the bare polished alloy bits spotless on my ZRX1100 and the ally on that ain't a patch on Euro ally. Or the other option to look at is get it anodized.It's not dear . The plus side is the finish is great and tough .The down side is if you mark it you can't cover it up where with paint or polish you can. Down load a manual as well. Indispensable. Good castle nut tools available from Mr Turbo Tool on Flea Bay. I've got loads off him and he's good gear at a cheap price. ------------- I used to be uncertain , but now i'm not sure anymore |
Posted By: albrown001
Date Posted: 05 Dec 2015 at 21:47
|
Thanks for advice and encouragement. Just ordered the swing arm removal kit for my abba stand and a castle nut removal tool for the swing arm nut off ebay (cheers for advice). Oh, and got a couple of weeks clearance to move the push bikes, some other cr@p to the front room, along with the bits I take off the bike to make room in the shed. Well that was the hard bit done Now I just got to take the bike apart...
|
Posted By: albrown001
Date Posted: 05 Dec 2015 at 22:27
|
Cheers guys. Very important and invaluable information for putting the bike back together. Obviously worried about steering/headstock and the swing arm side of things so any advice on those is greatly appreciated. I do have a couple of work shop manuals to fall back on and read as well now. But nothing beats experience and advice from people that have done it At present I am hoping to re-use bearings in swing arm and head stock. I'll be starting tomorrow taking the bike apart.
|
Posted By: davidrsurfer
Date Posted: 05 Dec 2015 at 22:30
|
Lots of photos & try to loose assemble parts rather than just drop them loose in a box. Like the shock & dogbone/ link, put the parts back together so you know where any shims or spacers go. ------------- Motorcycle friendly self catering holiday apartment Acorn Studio. See us at Air bnb. |
Posted By: albrown001
Date Posted: 06 Dec 2015 at 12:46
Made a start. Excited, confident but also cr@pping myself  The shed so far  The back room so far   PM sent Thanks Mark. Happy with everything so far. But could really do with advice about best way to drop the engine out.
|
Posted By: IanG
Date Posted: 06 Dec 2015 at 13:44
|
Can you not support the engine and lift the frame off? Never done it but I would think that could possibly be an easier option Watching with interest as I may decide to do this with mine at some point ------------- www.apworkshops.co.uk www.apriliaforum.co.uk www.apriliaownersclub.co.uk Looking forward to the next track day |
Posted By: albrown001
Date Posted: 06 Dec 2015 at 14:42
|
Not sure Ian, I have just ordered the swing arm removal set for my abba stand so I can get the swing arm off. The abba stand will support the bike and I can still take the swing arm off and drop the engine out. Going to drain and keep the oil tomorrow and dump the coolant and take off the radiator and exhaust pipes and all engine ancillary equipment tomorrow so pretty much as soon as the bits arrive from abba stands I can be thinking about taking the engine out. I am thinking it might be easier to take the engine out first before the wiring and steering off the bike. But not sure if it might be easier to do just as you have mentioned and take the forks and swing arm off first and sit the bike on its engine and lift the frame off the engine. Haven't decided yet. Already decided to drill the rivets out of the engine plate so it doesn't get the paint taken off it when it gets paint stripped/blasted. Will rivet it back on after the frame has been polished. Not looking about getting it super shiny, just the same as the swing arm is thats all. I think its going to look mint when I have finished. This is what it looked like before I started  |
Posted By: IanG
Date Posted: 06 Dec 2015 at 15:09
|
Yeah,those Caramac (showing my age there) frames are a bit gaudy aren't they? Typical Aprilia shell suit though,I wonder if someone in the graphics dept was colour blind and refused to admit it. Seems a lot of work to go to though if you aren't planning on an engine rebuilt while it's out. ------------- www.apworkshops.co.uk www.apriliaforum.co.uk www.apriliaownersclub.co.uk Looking forward to the next track day |
Posted By: albrown001
Date Posted: 06 Dec 2015 at 16:42
|
Just had engine serviced which is why I'm keeping the oil. I don't use cheap oil and its only done 150miles since service. Had valves done, new spark plugs and carb balanced or whatever the mechanics do. I am hoping not to disturb anything and leave most things attached to the engine. So it should all go back the same (I hope). I had an RSVR which was red and white before this one. It wasn't a Factory but I thought it looked way better with polished frame. You are right about the colour of the frame. I know why they did this as its a sign of the factory model. But not for this Factory though… Can't wait to get it back together and post pics before and after.I just ordered this motorcycle scissor lift from this place. Cheaper than anything in the UK. http://www.bs-motoparts.com/en/paddock-stands/motorcycle-lift/motorcycle-jack-scissor-lift-constands-m-red-i4014-35160-0.htm" rel="nofollow - http://www.bs-motoparts.com/en/paddock-stands/motorcycle-lift/motorcycle-jack-scissor-lift-constands-m-red-i4014-35160-0.htm Thought it might be useful. If I get through this without any problems next thing will be service the bike such as valves, balancing and such. Will have to get someone to show me how to do it though I think.
|
Posted By: albrown001
Date Posted: 07 Dec 2015 at 17:28
|
Up date. I drained the oil and coolant today and removed the throttle bodies and expansion tank. Unplugged most of the wiring and can see a little bit more round the engine now. Waiting for abba swing arm removal kit and scissor lifter to arrive so I can really get on with it. The wiring loom is falling to bits so will be spending a bit of time tidying that up at some point. Engine is covered in grease and oil. Most likely over time of me spraying stuff in there and some from the rocker cover gaskets. Will need a good was down with petrol I think and then I might cover it in ACR-50 spray before putting it back. Getting closer...  |
Posted By: 426hemi
Date Posted: 07 Dec 2015 at 17:36
| Have you thought about a scotchbrite finish, would make it look like a factory racer. |
Posted By: albrown001
Date Posted: 07 Dec 2015 at 17:41
Hi m8. Not sure what you mean? I was thinking about polished frame like the swing arm. Whats scotchbrite finish? If its worth doing and will look better I'm up for it
|
Posted By: 426hemi
Date Posted: 07 Dec 2015 at 17:56
| It's a fine brush effect that you find on things like race frames and Harris swing arms and gives a more satin finish. If you are going to mirror polish it be very very careful how you strip it as you can very easily create yourself a mountain of work, if you are looking at having the frame blasted send it to a specialist as thin wall ally can very easily distort when blasted or orange peel when the wrong media is used. Myself I would find somewhere that can Aqua blast as the water acts as a lubricant to the media and you get a lot better finish. |
Posted By: albrown001
Date Posted: 07 Dec 2015 at 18:11
|
Cheers m8. Just had a look at harris swing arm images and now know what you are on about. Might work out cheaper to do the frame in that but would have to do the swing arm in it too I think. The sub frame would almost match already. Might be a nice option that and one that I am thinking about now. Might have to put a poll up on the forum for polished or scotchbrite finish to decide
|
Posted By: MountainMan
Date Posted: 07 Dec 2015 at 18:29
| Further to what Hemi said, be very careful of getting the frame blasted. Had a frame done a few years back with walnut shell that came back with a slight twist, the swingarm pivot needed rethreaded and the headrace was oval. Utter nightmare for the sake of saving time. After that I always paint strip by hand with various grades of Scotchbrite flap discs. Takes much longer but patience pays off with a perfect surface for polish or respray. |
Posted By: 426hemi
Date Posted: 07 Dec 2015 at 18:37
| It is a problem with blasting , we have 6 blasters at work 2 inox, 2 aluminium and 2 glass bead so I have done my share of blasting and it is great for stress relieving metal, as said earlier if you are looking at blasting it take a look at the aqua blasting as it is a lot gentler and gives a more polished finish and find a specialist in it or you will have an expensive piece of scrap. |
Posted By: albrown001
Date Posted: 07 Dec 2015 at 19:14
|
Can you guys have a look at this place for me please? They advertise a grit blast cabinet which works on a vacuum and also aqua blasting. Is this the aqua blasting what you are on about? Would the vacuum blasting be better than aqua blasting for polishing afterwards? Cheers |
Posted By: 426hemi
Date Posted: 07 Dec 2015 at 19:22
| Vacuum blasting is still using just the grit where Aqua it is suspended in the water and gives a finer finish, me personally I would use Aqua but at the end of the day it's your frame and choice. |
Posted By: 426hemi
Date Posted: 07 Dec 2015 at 19:44
| It does blast but it takes longer as it is a lot less aggressive which is why you get a shinier finish as the media is suspended. |
Posted By: IanG
Date Posted: 07 Dec 2015 at 19:44
|
What about soda blasting? Apparently it gives a sealed satin like finish that doesn't need clear coat afterwards. Not sure were you'd find it though,I came across it somewhere online last week,pity I didn't make a note of where. ------------- www.apworkshops.co.uk www.apriliaforum.co.uk www.apriliaownersclub.co.uk Looking forward to the next track day |
Posted By: 426hemi
Date Posted: 07 Dec 2015 at 21:55
| It gives a very similar finish to Aqua blast depending on which size media they use in the water. |
Posted By: Shyted
Date Posted: 07 Dec 2015 at 23:06
|
I'm no know it all on the subject of blasting. Out of the three if i was blasting aluminium,my self i would use aqua. The finish is 2/3rds of the way to polish. Is the standard finish paint or anodize ? Any how.If you eat take away food ,save the plastic containers to put your small part's ,nuts and bolts in. Label them up with a felt marker. That way you don't forget whats what and you know where it goes. Saves them getting booted everywhere too. ------------- I used to be uncertain , but now i'm not sure anymore |
Posted By: albrown001
Date Posted: 08 Dec 2015 at 00:12
|
Cheers for advice on takeaways Done that. She's not happy about the back room. But she is happy about the space now in the bottom draw in the kitchen. I pinched all the containers |
Posted By: albrown001
Date Posted: 08 Dec 2015 at 11:00
|
Started doing that now where I can as getting bits everywhere. Anything that is screwed in to the frame though has got to come out so I have tried to keep it with the bits that came off. Taken photos as I go as well. Once the engine has come out I think the rest is not going to take long at all. I'll clean everything up whilst the frame is getting done so when I get it back I can just put it all back together.
|
Posted By: redratbike
Date Posted: 08 Dec 2015 at 11:04
|
when i stripped down my old 1100 gixer i had 2 pasting tables with containers and in the order i took pieces off i put them on or eventually under the tables,all in bags,boxes,containers etc so that nothing went missing.all tagged with where they came from. ..... if in doubt take photo's to refer back to later. -------------  |
Posted By: snox
Date Posted: 08 Dec 2015 at 11:18
| Same here here . when dropped engine out of a gsxr everything had photos and all bits where put in seperate containers labelled up . certainly helps a lot . |
Posted By: redratbike
Date Posted: 08 Dec 2015 at 13:19
|
just a thought do you really want a fully polished frame as its a sh*t to keep on top off... keeping clean and polished i mean ------------- |
Posted By: albrown001
Date Posted: 08 Dec 2015 at 13:51
Sound advice. I have 'binge watched' all 3 series of Elementary though and its all in my mind attic. Everything is in its right place at the moment. Can't say it will be tomorrow or after a couple of beers
To be fair not sure. I had a lovely red and white 06 RSVR before this one and loved the alloy frame. I then bought this Factory. Love it and keeping it, but hate the gold frame. Never liked it. It doesn't match any other part of gold on the bike and I think lets it down. Had a couple of ideas already. Polished, like the standard RSVR and also scotchbrite finish which I also think would look good. Not sure on which one but I am more leaning towards polished at the moment. It will be clear coated on top after polishing. Painting and anodising is not going to happen
|
Posted By: albrown001
Date Posted: 08 Dec 2015 at 13:59
|
On the off chance any of you gurus know what this box is? You can see the 3 connectors, brake light switch, speedo sensor and lambda sensor. In between the lambda sensor (big black connector) there is a box which fits in between the two connectors. Is this part of the Power Commander auto tune set up and has been added to the bike? Or is this part of OEM set up?  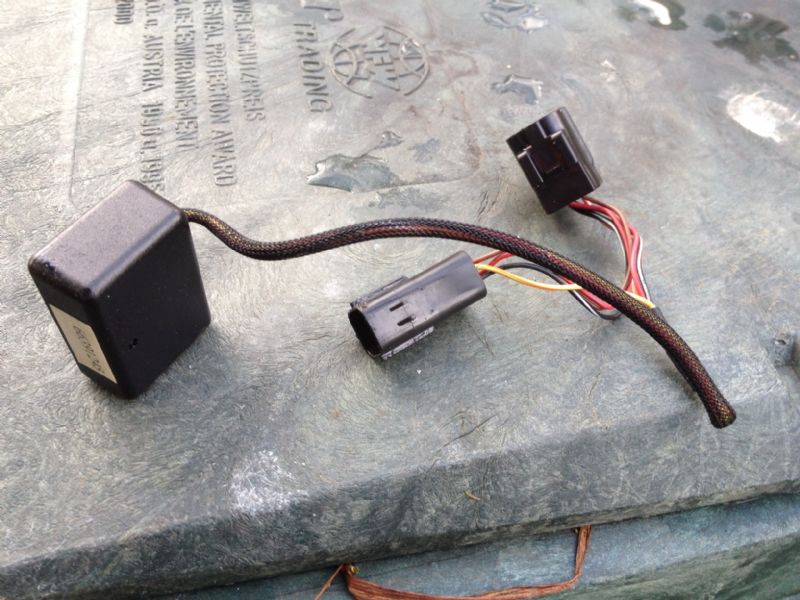 |
Posted By: Spoonz
Date Posted: 08 Dec 2015 at 14:15
| That's the 02 optimiser. It's usually there to allow a bike with the Ecu still in closed loop mode to run a custom map and ignore the oem Lambda reading or if you want to run an aftermarket header with no Lambda fittings. |
Posted By: albrown001
Date Posted: 08 Dec 2015 at 14:30
Cheers Spoonz. Helpful as always. Would the O2 optimiser be part of the Power Commander 5 stuff I bought? The bike has full akro system on it and evo air box. Tuning wise, is this the set up I should have and its been done right with the custom map? I know its the best its ran since owning the bike but it was a bit of a dog when I first got it. |
Posted By: Spoonz
Date Posted: 08 Dec 2015 at 14:47
It is part of a power commander setup yes. If the full Akra has no Lambda fittings then they would need the optimiser to run the bike with no Lambda fitted. The Diags in the ecu have to see the Lambda is present even if it's not being used and that part mimics it to fool the diags.
|
Posted By: albrown001
Date Posted: 08 Dec 2015 at 14:59
|
Thanks m8. Really helpful. Is it worth unscrewing the oil pressure sensor incase it gets damaged when removing the engine or leave it in? I am presuming removing the oil pipes that are under the engine would be a good idea too?  |
Posted By: Spoonz
Date Posted: 08 Dec 2015 at 15:12
|
It might be worth talking to Griff as he is doing it in his sleep and will know the common pitfalls but I know generally they use 2 bods when lowering and raising the motor as it's not easy watching everything on your own.
When we did Garin's Big Bore the injector plug got trapped so watch for wires getting pinched as you lower the motor, There wasn't any issues with the oil pressure sensor that I recall but the oil pipes are at risk of getting crushed so I would pull them off if it were me. |
Posted By: albrown001
Date Posted: 08 Dec 2015 at 16:02
|
Ok thanks Spoonz will do. Another question for you or and all the other gurus. I am sourcing polishing and top coat for protection. Advice I have been given so far is chemical dipped to get rid of the paint and not to aqua blast but to then go straight to polishing and I have found a couple of companies near me to do it. But for protection on top of polishing I have been advised that the factory stuff is most likely clear anodising and not a lacquer. Anyone know if this is whats is actually on the swing arm and not a clear coat of lacquer?
|
Posted By: Spoonz
Date Posted: 08 Dec 2015 at 16:15
|
100% it's clear anodised. Laquer will do the job but won't last as long. If you chip it water often gets underneath and spreads as laquer just sits on the metal whereas that doesn't happen with anodising as it penetrates into the metal surface itself by a micron or 2. |
Posted By: albrown001
Date Posted: 08 Dec 2015 at 16:43
|
Cheers Spoonz. It will be getting clear anodising then. I had a feeling it was the more research I had to do. I'm going to clean up the swing arm and take it in to the anodising place so they can tell me how polished the frame needs to be to match the finish of swing arm after it has been clear anodised. I can't really rework the swing arm again as I was advised not to do it, so only real economical solution is to match the frame with the swing arm. |
Posted By: albrown001
Date Posted: 09 Dec 2015 at 12:09
|
I also like the re movable hex key so I can stick a socket on the end of it to jack it up or lower it if I want to. Just to wait for the swing arm removal kit from abba stands and its engine out time. Wish me luck 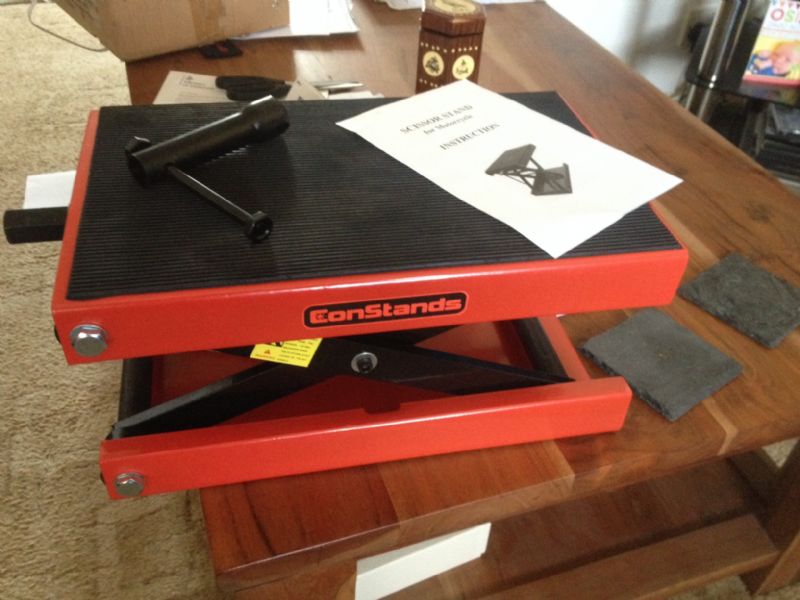 Just got these through about 2hrs later  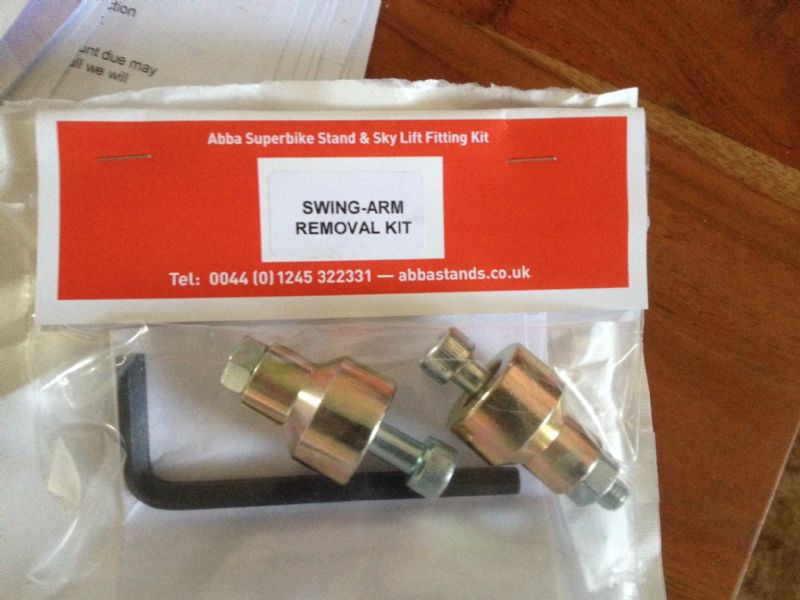 |
Posted By: NickyBoy1984
Date Posted: 09 Dec 2015 at 23:59
Yaay nice one matey, following this thread hehe  NickyBoy  ------------- www.rsvr.net www.apriliaperformance.co.uk www.apriliaforum.co.uk www.apriliaownersclub.co.uk |
Posted By: Shyted
Date Posted: 10 Dec 2015 at 23:51
|
albrown . If your looking to get the look of a none painted,factory finished frame,then the finish is actually acid anodizing. They dip to clean, acid etch then anodize with hot sulfuric acid solution , but you can have a variety of finishes even gold again that matches the wheels. If you polish first after it's been dipped,the finish will have more luster .Like this. Before. http://s21.postimg.org/u8ecz2slz/IMAG0680.jpg" rel="nofollow - http://s21.postimg.org/u8ecz2slz/IMAG0680.jpg  After. http://s4.postimg.org/uan1xkbm5/IMAG0716.jpg" rel="nofollow - http://s4.postimg.org/uan1xkbm5/IMAG0716.jpg  ------------- I used to be uncertain , but now i'm not sure anymore |
Posted By: albrown001
Date Posted: 11 Dec 2015 at 01:07
|
Cheers m8. That looks mint. I have a friend who says he can clear anodise the frame. Thing is its not going to cost me much to get it done as I know him. I spoke to the polishers and they can highly polish the frame for around £100. Still open to suggestions, but at the moment going to take my swing arm to my friend to have a look at and ask him how shiny does the frame need to be to match the swing arm. I know I can bring the finish up on my swing arm quite easily but I really want my frame and swing arm to match. I don't think I will end up with a frame brighter than my swing arm, but probably wouldn't look to bad if it was to be fair. I'm looking at dropping the engine tomorrow so should have the frame and swing arm ready to go next week. Don't think I'm going to see the bike back together till end of Jan to be fair |
Posted By: Shyted
Date Posted: 11 Dec 2015 at 10:51
|
If you want a perfect match,do both together. The bearings in the swinging arm on the needle roller side need careful attention though. If you want it close enough a man on a flying horse won't notice then just do the frame and live happily ever after.If you like i will get photo of the finish on the two ensemble . Every one who sees it now asks if i bought a replacement and when i tell them it cost £40 total including the fuel to deliver and collect it the questions start because the finish is that good. Give us a nod if you want a pic. ------------- I used to be uncertain , but now i'm not sure anymore |
Posted By: albrown001
Date Posted: 11 Dec 2015 at 11:47
|
I did look at that. My friend who is going to do the clear anodising advised against it. It can be done but all the old stuff would have to be ground off, or polished off which would cost a lot of money. Also spoke to the polishing guys and they said that it was not advisable too. I believe that consecutive anodising is not a good idea to the metal either talking to my friend. I think just doing the frame will be the most economical way of doing it on my budget. However it turns out and whatever I end up doing, it has got to be better than the awful gold colour. I got a bit stuck last night as couldn't get a couple of hex bolts out on the front of the bike as they had rusted in. So just walked away. Did they this morning. Learnt a trick from the RC car world of getting knackered hex bolts out by smacking in a star drive with a hammer. They just popped out after that. No problems.
|
Posted By: redratbike
Date Posted: 11 Dec 2015 at 12:19
|
have i got this rightthe frame is already anodised this needs acid dipping/un-anodising then polishing and reanodising so the swingarm needs the same surely ,acid dipping/un-anodising,polishing then reanodising? ------------- |
Posted By: IanG
Date Posted: 11 Dec 2015 at 13:20
|
We get a lot of alloy stuff anodized at work and it's not a particularly good idea to have more than one go at it. We have both clear and colour done and second time round is never as good as original, plus it plays havoc with maufacturing tolerances. Although tbf we work in microns for most of our parts. Clear anodizing also shows up any scratches or blemishes,the best finish I find comes after tumbling as it removes all machining marks but that is not appropriate for a bike frame. Also,when anodizing make sure any helicoils or other steel parts etc are removed,it makes an awful mess otherwise  ------------- www.apworkshops.co.uk www.apriliaforum.co.uk www.apriliaownersclub.co.uk Looking forward to the next track day |
Posted By: Shyted
Date Posted: 11 Dec 2015 at 13:23
Yes dip the lot it's the same process and where i caused myself many hours unnecessarily rubbing down. When i got to the anodizer he laughed at me and said "we just strip them in the tank,that preps the surface for etching too". The comment i made about the bearings is they need to come out for the process so you have an additional cost . The arm needs getting up to temp as well to remove the needle roller cage , for easy removal. Getting them in without damaging is the thing so heat up for 10 mins again and have the bearings in the deep freeze.Don't forget to measure the depth they're pushed in too. The thing that anyone needs to understand is, 1 , any marks or corrosion area marks will stay. 2 All other metal needs to be stripped off. The finished product is well worth the effort. ------------- I used to be uncertain , but now i'm not sure anymore |
Posted By: Shyted
Date Posted: 11 Dec 2015 at 13:26
Ha ha we must have read and commented at the same time. ------------- I used to be uncertain , but now i'm not sure anymore |
Posted By: IanG
Date Posted: 11 Dec 2015 at 16:39
Yeah  , ,Anodizing is the bane of my life,most parts we make have precision fits for bearings and dowels etc and the customers always want tolerances to apply after anodizing. If we finish holes a few microns oversize to allow for growth they never grow enough ,and if we finish them to size they always end up too tight. Leaving them u/s and finish machining post treatment means two separate ops and we run the risk of damaging the finish. It's a no win situation really as the anodizers can't guarantee growth, although they quote figures they can't or won't stand by them. None of this is relevant to bike frames though I think,although those bearing fits you mentioned perhaps need plugging for safety? ------------- www.apworkshops.co.uk www.apriliaforum.co.uk www.apriliaownersclub.co.uk Looking forward to the next track day |
Posted By: 426hemi
Date Posted: 11 Dec 2015 at 16:43
| Have you seen the diamondyze that camcoat are now doing, similar to anodising but the diamondyze goes about 70% internally they reckon. |
Posted By: IanG
Date Posted: 11 Dec 2015 at 17:04
|
That looks very interesting,thank you Apart from bike parts for me I'll bring this to works attention,as even at greater initial cost it could save a costly 2nd op on many parts. One sticking point could be that our customers range from Medical through Defense and all points in between,and they often specify certain processes. ------------- www.apworkshops.co.uk www.apriliaforum.co.uk www.apriliaownersclub.co.uk Looking forward to the next track day |
Posted By: albrown001
Date Posted: 11 Dec 2015 at 17:42
|
Thanks for the replies guys. Got the engine out. Not too hard to be fair. The Constand I bought from Germany is well worth the money. I used my battery drill with a socket on it to lower it. It worked a treat. The Abba stand is mint too. One tip I will be doing next time and when putting the engine back is putting the front lift arm on it as the stand is too easily over-balanced forward with the swing arm off. Just makes the stand a lot more solid with the bar on. Personally I think it would be a good thing to put it on there in most cases when working on the bike. Especially if you have a plywood floor in your garage or shed. I had no shims between the front engine mounts. Just the big thick spacers that hold the radiator mounts. Are there supposed to be shims in there? 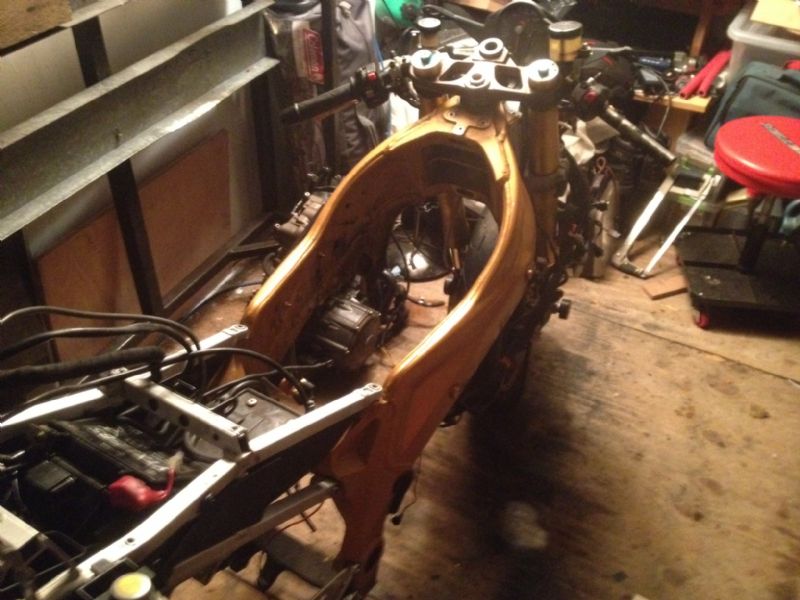 |
Posted By: albrown001
Date Posted: 12 Dec 2015 at 16:06
|
I'm really glad I did this now. I think that this engine has been out of the bike, or someone has been tinkering and not sure what they were doing. The lower right rear engine bolt was loose, the top right engine bush wasn't even touching the engine and the bolt wasn't done up and one of the front left engine bolts wasn't done up. Also found a big chip inside the steering stem where someone had tried to knock the inner race out and chipped the alloy. There is only one key way access on the top one on mine so I had to used a screwdriver on one side and just gently tap it out and used a hex driver on the other side. The frame inside had quite a bit chip in it where someone has obviously twatted it with a screwdriver and not looked what they were doing. Any road, cleaned the frame off and swing arm ready for next week. There are two press in thread inserts inside the frame where the ignition coil bolts screw in to. Not sure if these are alloy or steel. If they are steel then they won't be in there after anodising  The frame has also got lumps of rubber inside it that are put in there as its been made. Not sure what will happen to them either. You can't get them out.   |
Posted By: IanG
Date Posted: 12 Dec 2015 at 18:59
They sure won't if they're steel,and neither will the alloy around where they used to be I sent something for anodising once complete with helicoils,big,BIG mistake. It not only blew big holes in the alloy but the platers were on our backs as it ruined their tanks and the other contents. If in doubt,get them out. One would like to think the guy doing the treatment would check parts for suitability but given the standard of foreign muppet employed these days,or even dumb Brits with a grievance they could quite likely chuck it in anyway just to watch what happened. Just as an afterthought,you'd think Aprilia would have had a matching colour/finish on the s/arm ? ------------- www.apworkshops.co.uk www.apriliaforum.co.uk www.apriliaownersclub.co.uk Looking forward to the next track day |
Posted By: albrown001
Date Posted: 12 Dec 2015 at 19:48
|
Thanks m8. I wasn't aware that they would blow the alloy out as well. Thats not good. Will try to get them out if I can then if we are not sure. I think I could screw a bolt in to the threads and basically rip/pull the insert out of the frame if I have to. Where the plastic bits that go up the side of the frame are also bits that have been added to the frame. Not sure on these either. I think they are welded to the frame, if they have my guess is they will be aluminium as well. My thinking is Aprilia wouldn't make two different frames. But thinking about the RSVR and the Factory its possible that they might. My thinking is that both the painted frame and the clear anodised frame is the same frame and the inserts were in there on both frames before any work was carried out. Only way to really check I suppose would be to have a look at an RSVR clear anodised frame and see if the inserts have been anodised or have been put in afterwards. Or just pull them out of the frame and try to put them back in afterwards if I can. Worse case scenario I end up having to buy a new frame already clear anodised
|
Posted By: albrown001
Date Posted: 13 Dec 2015 at 00:03
|
IanG Cheers for the advice earlier. I was pondering over it and couldn't rest till I went back out and checked, so took used a flywheel from one of my RC car race ignitions and funnily enough the inserts are ferrous so they will definitely have to come out. I also had a look at the bits where the plastic side bits that go down the frame fasten on to that hold the fairing and they are not magnetic and also seem to be tacked on by small welds so guessing that these are aluminium so should be safe, but will get them checked. Will run the flywheel over the entire frame at some point just to check if there is ferrous metal on there and also get my friend who is going to do the anodising to have a good look at the frame. If anyone else has got any advice before I go any further please don't hesitate to add. Cheers.  |
Posted By: albrown001
Date Posted: 13 Dec 2015 at 00:13
|
If anyone owns an RSVR gen2 with raw alloy frame it would have been clear anodised. Would really appreciate if you could have a look at it and if possible just unscrew one of your plastic side bits that go on to the side of the frame (2x m8 bolts). Will need side panel removing. And have a look at the two round mounting points that the screws go in to. Could you have a look at them and see if they are anodised the same as the rest of the frame or look like they have been added afterwards. Thanks If there would be any chance of posting a couple of close up pics of them that would be most helpful too.
|
Posted By: albrown001
Date Posted: 13 Dec 2015 at 02:22
|
Bit stuck now. And what to do. There is no way they will come out. I think they have been put in from the inside along with the rubber when the frame was getting put together Only option would be to cut them out… I think the rest of the frame is good to anodise though apart from the plastic side mounting points on each side mentioned earlier. Any advice
|
Posted By: MountainMan
Date Posted: 13 Dec 2015 at 09:39
|
Personally, I'd go for one of three easy options rather than risk buggering up a perfectly good frame. 1: Put it all back together again as the black and gold version looks brilliant. Very old school JPS. 2: Get it and the swinger painted black. That would also look class. Maybe black wheels too. 3: Buy a silver frame and store the gold one for should you ever sell the bike. |
Posted By: IanG
Date Posted: 13 Dec 2015 at 10:55
|
That would be my plan too. But then details like frame colour really don't matter that much to me,if I was that bothered I'd paint it or maybe wrap it,I certainly wouldn't anodize it. But then if we all thought there was only one option life would be very boring. Vive la difference as our Froggie neighbours probably wouldn't say ------------- www.apworkshops.co.uk www.apriliaforum.co.uk www.apriliaownersclub.co.uk Looking forward to the next track day |
Posted By: DrD
Date Posted: 13 Dec 2015 at 11:49
|
Looking at the parts fiche those items that will ruin your anodising do not seem to be available seperately. If it were mine, I would reconsider what you intend to do rather than wreck a good frame in the "wrong" colour. ------------- RSV 2003 |
Posted By: davidrsurfer
Date Posted: 13 Dec 2015 at 12:01
|
Suspect they are steel nut inserts which would have been out in after the ali was anodised. Powder coat it! ------------- Motorcycle friendly self catering holiday apartment Acorn Studio. See us at Air bnb. |
Posted By: Spoonz
Date Posted: 13 Dec 2015 at 13:46
|
The inserts are generally riv nuts. I replaced several on mine and mates subframes and it's easy enough. The difficulty is getting the old ones out with them dropping inside the frame when drilled. Not a problem if they fall somewhere with a opening that you can tip them out of. I'm also not sure if the entire frame is anodised. Generally cast surfaces don't anodise so well so it's possible only the finished surface sections were anodised separately before the frame was assembled.
|
Posted By: albrown001
Date Posted: 13 Dec 2015 at 20:58
|
Cheers for further help and advice guys. Really helpful. So I am assuming at the moment that its the same threaded rivet in the frame for the ignition coil bolts as in the sub-frame for the seat. Won't really know till I get them. I don't know yet but if it is then there might just be a chance of me getting them out of the frame, leaving the original hole and then smacking a new rivet in after anodising if I get it done. Going down to see my friend so he can have a look at the frame and give me some advice on the anodising before I go any further and i'll take it from there. Either way, now I have come this far I am having a polished frame one way or another. Anyone got a Gen2 polished alloy frame that they might want to swap for my gen2 factory gold frame before I go any further? |
Posted By: davidrsurfer
Date Posted: 13 Dec 2015 at 21:25
|
Genuine rivnuts are fitted using a sort of pop rivet gun if I recall. ------------- Motorcycle friendly self catering holiday apartment Acorn Studio. See us at Air bnb. |
Posted By: albrown001
Date Posted: 13 Dec 2015 at 21:58
|
Yes I literally just found that out, but looking at it I could probably make my own tool. I will know if I can when i see the rivets which I have just ordered. I also don't think that there is any way of getting the rivet out of the frame because of this. I Can't drill them out as I can't afford them to drop in to the frame. Need to somehow get them to remove outwards. I'll have a think and make my mind up tomorrow. I was thinking about just drilling them out with a hole cutter and weld a top hat with an M6 thread in the middle of it in to the frame. All depend on what my friend says about anodising tomorrow
|
Posted By: albrown001
Date Posted: 13 Dec 2015 at 22:07
|
Not quite sure how those frame threaded rivets work. I think when you screw something in to the thread it pulls up something like a cylinder, up the inside of the rivet making it tight in the hole. If this is the case I might be able to knock the barrel bit back down inside the rivet and be able to then get the rivet to come though the frame. If this is how they work then there is no amount of pulling on the thread that will make the rivet come out. Basically the more you tighten down on it the tighter the rivet gets. The more I think about this, the more I suspect thats how they work. I'm also thinking that if I can knock the threaded barrel, if thats how they work, back down I might be able to get something on top of the barrel so I can use the threaded barrel to help pull the rivet out. |
Posted By: Spoonz
Date Posted: 13 Dec 2015 at 22:47
| I have a riv nut tool and it works exactly like a normal rivet and expands behind the hole. It screws onto the thread and then pulls on it to expand the crushable area. |
Posted By: albrown001
Date Posted: 14 Dec 2015 at 00:20
|
Cheers Spoonz. Its looking a bit better now to be fair. I got fed up deciding so just drilled them out. No point going round in circles. Once I got them out I realised there was no way that they were going to come through the frame. Not sure if that is a thin washer on there or some coating or thin metal lining on there or what. There was no way of getting them out without them falling in to the frame. Going to weld some top hats with M6 threads down the centre of them. It will be good as new when I get them done. I also drilled out the frame plate so when i put it back on it looks like new. The ends of the rivets that held it on dropped inside the frame. Also managed to get both of them out too which was a bonus. So far the frame is looking good. Lets hope my friend gives me some good news tomorrow    |
Posted By: MountainMan
Date Posted: 14 Dec 2015 at 09:55
| I admire your bravery. Not ashamed to admit I'd have wussed out and put it back together. Good luck with it. |
Posted By: albrown001
Date Posted: 14 Dec 2015 at 12:27
|
Thanks m8 I really appreciate that. Its not finished yet. There's lots more to follow |
Posted By: MountainMan
Date Posted: 14 Dec 2015 at 14:24
| If you are willing to drill out factory fit rivnuts, you'll have no bother summoning the courage to tackle anything else you have planned...or not planned as the case may be. Meanwhile I'm still trying to find the balls to have a go at the front exhaust studs on mine. Seized solid and I refuse to break a stud. Ha ha |
Posted By: IanG
Date Posted: 14 Dec 2015 at 18:04
|
Split the nuts with a cutting disc in a dremmel or grind a flat almost down the stud. Once you get near the nut's tapping size they'll relax and you'll be able to unscrew them without any bother. Once you have the pipe off spin a dienut down the studs to clean any crap out of the threads. ------------- www.apworkshops.co.uk www.apriliaforum.co.uk www.apriliaownersclub.co.uk Looking forward to the next track day |
Posted By: albrown001
Date Posted: 18 Dec 2015 at 15:21
This is the frame so far after I steam cleaned it. I had the paint chemically stripped. It had no blasting of any type as I was advised not to do it by the polishers. Its looking quite shiny already. I think this is going to come up really well.  These are the 20mm holes where I had to drill out the threaded rivets that were used for the HT coil bolt mountings.  I made up some aluminium insets with an m6 thread down the middle. I stuck some long m6 bolts in to them just so they cannot drop in to the frame and then not be able to get them out. 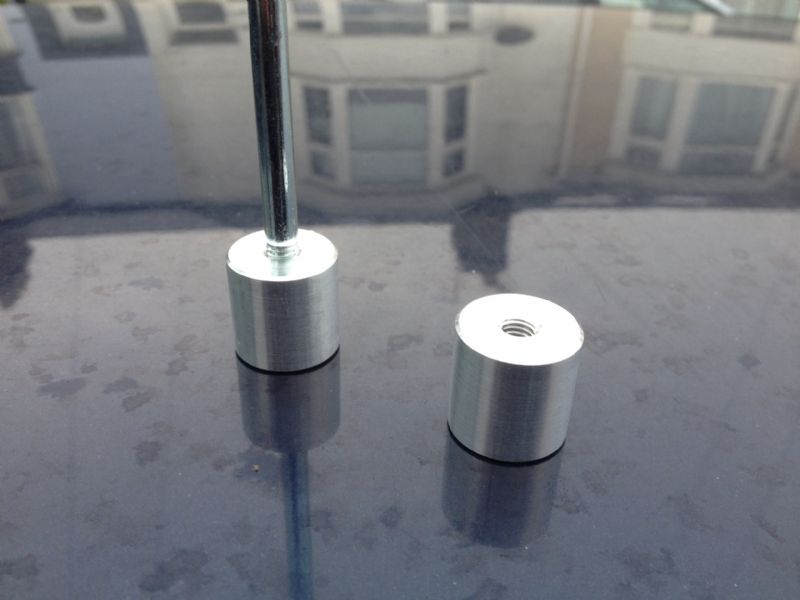 I'm going to get these welded in to the frame. My thinking is the long bolt will help locate them in the right place whilst welding. Going to look at getting them around 1-2mm proud of the inside of the frame. Then the frame will be going up to the polishers.  I think at this stage now how this turns out will all be down to the clear anodising.
|
Posted By: redratbike
Date Posted: 18 Dec 2015 at 15:32
------------- |
Posted By: Spoonz
Date Posted: 18 Dec 2015 at 15:51
|
I think it will be ok, but it is a one way ticket as stripping the anodising should it go wrong is not really an option as you will start losing metal thickness. But powder coat as Mark said would get you out of trouble. Early Gen 2 Factory models had a blackish frame so you could go that route in powder coat. |
Posted By: redratbike
Date Posted: 18 Dec 2015 at 16:01
|
or hydrodip it lots of finishes available there ------------- |
Posted By: davidrsurfer
Date Posted: 18 Dec 2015 at 16:07
|
Looking good there. While the frame is away getting polished you can get some of those weeds out of your lawn. ------------- Motorcycle friendly self catering holiday apartment Acorn Studio. See us at Air bnb. |
Posted By: Spoonz
Date Posted: 18 Dec 2015 at 16:14
Have you got shares in building and gardening services or something ? I've got to skim my walls and paint my lounge door and he has to weed the garden. I reckon some OCD is kicking in. If so Stu's bike must do your head in
|
Posted By: davidrsurfer
Date Posted: 18 Dec 2015 at 16:28
|
------------- Motorcycle friendly self catering holiday apartment Acorn Studio. See us at Air bnb. |
Posted By: MountainMan
Date Posted: 18 Dec 2015 at 16:39
Yeah! Snakeskin frame! Ha ha Good call on the chem dip Albrown. Leave the blasting for wrought iron gates. It's looking well already. |
Posted By: albrown001
Date Posted: 18 Dec 2015 at 16:51
|
Fcuk the gardening. Thats woman's work
|
Posted By: IanG
Date Posted: 18 Dec 2015 at 19:27
|
Do you fancy applying for Sports Personality of the Year? Sorry,couldn't resist given the hysteria after Tyson Fury's quite reasonable thoughts ------------- www.apworkshops.co.uk www.apriliaforum.co.uk www.apriliaownersclub.co.uk Looking forward to the next track day |
Posted By: albrown001
Date Posted: 19 Dec 2015 at 00:40
water sports personality of the year? 
|
Posted By: albrown001
Date Posted: 29 Jan 2016 at 00:24
|
Its a bit shiny There are a few bits like the inside which i asked not to bother with to save a bit of money but all the bits you can see are shiny. Especially the sides of the frame. They are currently a mirror finish. I took this pic inside the store room and there wasn't much light so the pics don't really do it justice. Hoping it will stay like it after anodising.
  Had a chat with the anodisers yesterday and dropped it off with them. We talked for a bit and they are going to have a think about the best way to go round it. There could be a problem with the metal and the anodising will either come out really well or the frame will just go black. I have left it with them to have a think about how they are going to go about it. Any road, can't really do anymore. Will have to wait for a bit and then I think we will just have to go for it |
Posted By: badapple
Date Posted: 29 Jan 2016 at 01:56
|
Good luck hope you get the finish you're after. ------------- I started out with nothing and I've still got most of it left |
Posted By: albrown001
Date Posted: 05 Feb 2016 at 16:18
|
Chemically brightened then anodised. This is brighter and cleaner than the clear anodised frame from the factory. Oh yea The welding has got silicone in it which come out black during the processes. Its easy to clean off, bit of furniture polish and a cloth. But I can't be arsed doing it. Its good enough to put straight back together      |
Posted By: redratbike
Date Posted: 05 Feb 2016 at 16:21
|
Liking that... bet you are well pleased how it turned out .....what sort of cost was it in the end???. I bought one of those bargain stands from Germany today should be here middle of next week. ------------- |
Posted By: albrown001
Date Posted: 05 Feb 2016 at 16:31
|
The guy that did this was called Noel. There is another guy called Tony. Both of them are the shop supervisors and there is nothing that these guys can't do or don't know how to do. They work for a company called Dorset Aluminium. Dorset Aluminium anodise many specialist parts for such companies as Ohlins, Pro-Bolt, Talon, Ariel. What these guys don't know in this field just isn't worth knowing. These guys did the polishing. You want to speak to Mike. http://www.mmpolishingltd.co.uk You want to chemical strip the frame, not bead or aqua blast it and then steam clean the frame to get all the loose bits of paint off. Cost were £25 chemical stripping, £140 for polishing and £100 for anodising. A lot of money but worth every penny in my books, especially the anodising. That was exceptional for what Noel did. |
Posted By: albrown001
Date Posted: 05 Feb 2016 at 16:36
Yes well please with it. The pics don't do it justice, it actually changes colour depending what angle you look at it as its so shiny and the finish is mint. Not surprised since they do the Ariel frame. These guys really know what they are doing. I was well lucky finding them. About £300 all up with petrol and everything.
Are you on about that engine lift stand that I bought? If you are its really good and excellent value.
|
Posted By: badapple
Date Posted: 05 Feb 2016 at 16:43
|
That looks spot on much better than gold imo ------------- I started out with nothing and I've still got most of it left |
Posted By: redratbike
Date Posted: 05 Feb 2016 at 17:14
I didn't realise they did the Ariel frame...cos that is a work of art ------------- |
Posted By: legend88
Date Posted: 05 Feb 2016 at 17:24
|
So if it was chemically 'brightened', was there no need to have done the polishing in the end? |
Posted By: albrown001
Date Posted: 05 Feb 2016 at 20:27
That engine lift stand is mint. Wait till you go to pick it up. Its well heavy Yes its work of art. A £4500 work or art. I saw one up close with Noel and it really is beautiful and the anodising processes that they do to them are exceptional, they really look after them. They have left all the engineering and machining marks on them too. It really is a work of art and looks mint and the finishing touch is what Noel does to them. They are perfect
|